
Table of Contents
| 1. Running an example model |
| 2. The Basics |
3. Using ask |
This practical will take you through the first steps to creating a model in NetLogo. By the end you will have an understanding for the main components that make a NetLogo program.
To start, move on to the first part: 1. Running an example model
To start off, we'll just look at two models so that you can get an idea about how NetLogo works.
The first thing to do is start NetLogo. You can find the it by going to Start - All Programs - Departmental Software - Environment - Geography - NetLogo 5.0.2 > NetLogo 5.0.2 (or type 'NetLogo' into the search box).
NetLogo ships with a variety of ready-made models in the 'Models Library'. To see a list of the models that are available go to File -> Models Library.
To begin, we will use a version of Schelling's famous model of residential segregation. The model is listed under Social Science -> Segregation. Start that model now. At each iteration of the model, each agent looks at its 8 neighbours and works out how many are the same colour as itself. If fewer than a certain percentage.
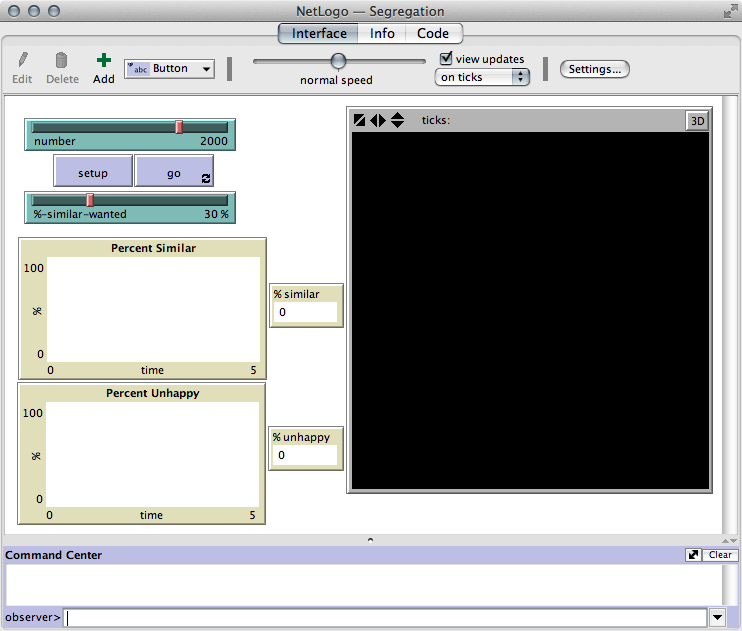
The model has the following graphical elements:
For more information about the model, or the function of the sliders and graphs, you can click on the 'Info' tab.
Spend a few minutes experimenting with the model and think about the following questions:
Finally, have a look at the code that underpins the model (click on the 'Code' tab). NetLogo code has been designed to be easy to use; you can accomplish a lot without having to become a fully-fledged computer programmer. The whole Schelling model has been written using only 79 lines.
Now have a look at another model called 'Virus' which is under 'Biology'. This model simulates the spread of a virus through a population as people come into contact with each other. Start by clicking on the Info tab and reading about how the model works.
Over the next few practicals we are going to build a model that looks similar to this one so play around with some of the settings to see how the model behaves.
When you have finished experimenting with different parameter values, move onto the next part of this practical to learn more about the basics of the NetLogo program.
In this part of the practical you will see how the basic elements of the NetLogo program fit together.
Firstly, it's important to understand how the program itself works. The main display consists of the following components:
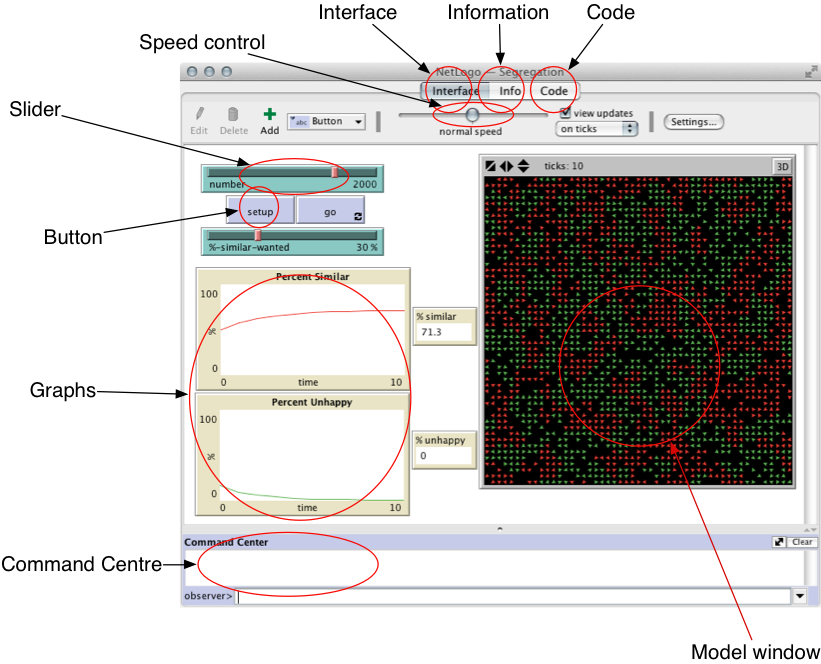
| Interface | This tab selects the main interface. This is where you can add elements (buttons, sliders, switches, etc.) that control the model and allow you to view the results. |
| Info | This tab presents information about the model you currently have loaded. |
| Code | This tab is where the you can write the computer code that controls the model. |
| Model window | This window shows the locations of the agents and condition of the patches (basically what is happening as the model runs). |
| Command Centre | The command centre displays output messages. It can also be used to interact with the model via commands (we will come onto commands shortly). |
| Buttons, sliders, graphs, etc. | These controls are used to interact with the model and understand what it is doing. You add them yourself, depending on which ones are needed for the particular application (not all models will need a graph of results for example). |
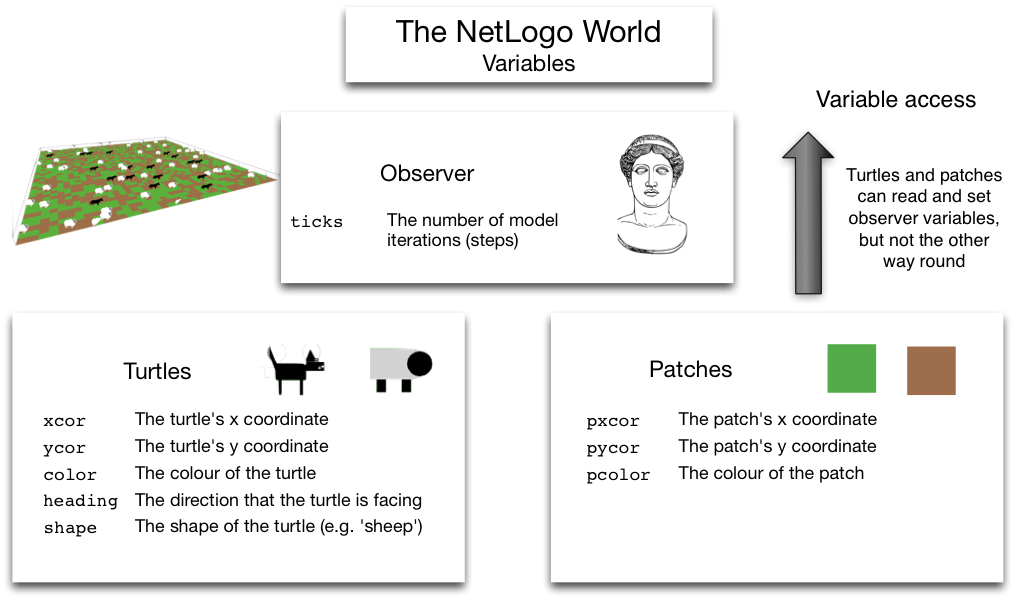
Before starting, recall from the lecture that a model in NetLogo consists of 'patches', 'turtles' and the 'observer' (look at the lecture slide to refresh yourself if you have forgotten).
The command centre can be used to send commands to the model. There are two parts: the top part shows outputs from the model and the bottom part allows you to enter commands that are sent to the model. NetLogo has a fantastic user manual, so if it isn't clear what a command does, or how it should be used, look it up. The NetLogo Dictionary is particularly useful. Each time a new command is introduced, I have included a link to the official documentation.
show
commandshow. Type the following
into the command centre:show "Hello World"
You should see NetLogo repeat "Hello World" back to you, like this:
observer> show "hello world"
observer: "hello world"
Try this again with some other text (don't forget to put quotes around the text).This might not seem particularly useful, but the show command comes into
its own when you combine it with other commands.
count commandshow and count as follows:
show count turtles
What does this show you? Try this as well:
show count patches What does that tell you?Two things are actually happening when you run those commands. The
count command is counting something (in this case the number of turtles
or patches). The show command is behaving the same way as it was before,
except now it is showing us the number provided by the count command,
rather than the "Hello World" text.
with command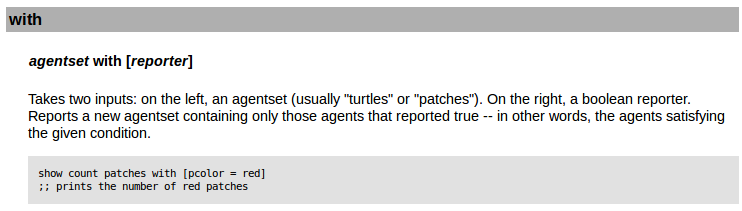
with command to influence a group of all the turtles
or patches. Try the following:
show count patches with [pcolor = green]
show count patches with [pcolor = brown]
What is happening with those two commands?
The with command actually needs two pieces of information. It needs
a group of agents or patches on the left, and a test on the right (in this case
we test the colour of the patches). You can find more information about all the
commands available in the
NetLogo documentation (click on 'NetLogo Dictionary' and then look
for the 'with' command.)
In NetLogo, it is possible to save values in things called 'variables' (for info, see
the documentation on variables).
Different parts of the model can check the values of the variables to decide what they should do.
For example, in the Wolf Sheep Predation model, each of the sliders changes the value of a variable.
So, if you move the wolf-gain-from-food slider from 20 to 40, that will change
the value of a variable called wolf-gain-from-food. Each time a wolf eats a sheep
it checks the value of that variable to decide how much new 'energy' it will gain. In this case,
it will now get 40 units rather than only 20.
Individual turtles and patches can also have their own variables; this is one of the ways
that models can account for heterogeneity (we'll cover this in more detail in later lectures).
For example, in the Wolf Sheep Predation model, the wolves and sheep
have a variable called energy. This records how much energy each individual
wolf or sheep will have at any given time. If this reaches zero, then they will die.
We'll look at variables in more detail in the next section.
set commandThe last command we'll look at is set. This command can be used to
manually change the values of variables without having to use a slider. You tell the
command which variable to change, and what to change it to.
set commands. Before running
each command, setup the model. Then execute the command and then let the model run for
10-20 seconds.
            set sheep-gain-from-food 12


            set sheep-gain-from-food 50


            set initial-number-wolves 100


            set wolf-reproduce 10
You've been introduced to a large number of commands so far. In this short activity, see if you can work out what the commands are doing and then build your own. For these questions, we will use the 'Wealth Distribution' model (under 'Social Science' category). Some of these are tricky, if you get stuck ask someone else sitting nearby or a demonstrator.
Begin by setting up the model. You should see a large number of "poor" red people, fewer "middle class" green people and even fewer "rich" blue people. The colour of a patch shows you how wealthy it is (brighter yellow -> more wealth). For more information you can look on the 'Info' tab.
Note the commands that you would use, as well as the answer, to answer the following questions:grain-here
tells us how much wealth (or grain) is present at each patch in the same way that
pcolor told us the colour of each patch).
Command: Number:
Once you have finished this, move onto the next part to learn about some more commands.
askIn this part, we will start to use an extremely useful command: ask.
There is more information about the command in the official NetLogo documentation
(http://ccl.northwestern.edu/netlogo/docs/programming.html#ask).
But first, we'll look at the different contexts in a bit more detail.
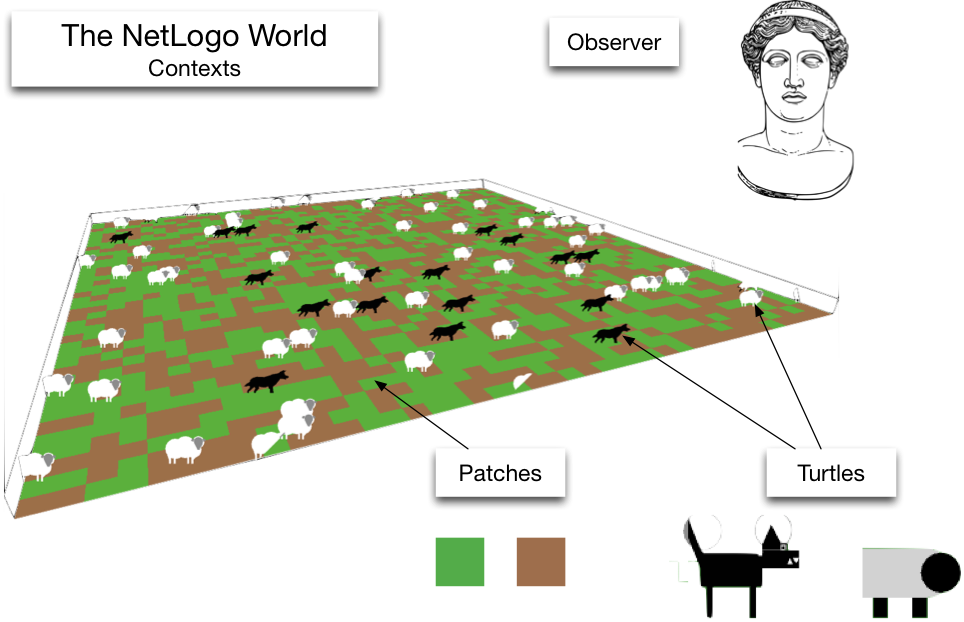
Recall from the lecture
that there are three different contexts (actually
there are four, but we won't look at the 'link' context in this course). Also, remember
that turtles, patches and the observer each have different variables that store pieces
of information about them. The figure below gives examples of some of the different variables
that patches, turtles and the observer have access to (this example is from the Wolf Sheep Predation
model, but the ideas are the same for all models). Note that patches and turtles both have
variables that store their (x,y) coordinates and colour (xcor, ycor,
color). To stop us from getting confused, the equivalent patch variables have a 'p'
in front of them (pxcor, pycor, pcolor).
There is also more information in the NetLogo User Manual.
So far, all the commands that have been issued have been sent to the observer context. This is the 'God' context that oversees the model. In order to give commands to turtles or patches, and to change the values of their variables, commands need to be sent to the turtle and patch contexts respectively. One way to do this, is to tell the command centre specifically to send commands to the turtles or patches, rather than the observer. We will do this now.
setup command in the Command Centre).pcolor variable. This should cause the patches to change colour:
set pcolor blueWhat happens?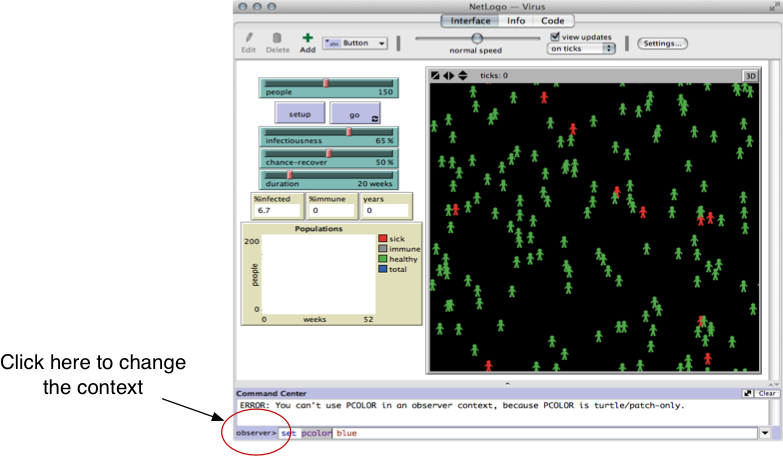
If everything worked 'correctly' (or at least as it is supposed to) you should have seen
the following error in the Command Centre: ERROR: You can't use PCOLOR
in an observer context, because PCOLOR is turtle/patch-only.
The message is saying that you cannot change the value of the pcolor
variable, because that variable belongs to turtles and patches only. The observer
has no variable called pcolor.
To get round this problem, we can tell the Command Centre to send the command to the patches instead of the observer.
set pcolor blueWhat happens this time?color, not
pcolor).
set color brownWhat happens this time?You should see all the turtles turn brown. This is because we have just changed the value
of their color variable which, like pcolor for patches, controls
their colour.
pcolor):
set pcolor blackWhat happens this time?Did some of the patches turn black? Which ones?
What's happening here is really, really useful in models. Turtles are given direct access to the patch that they are currently standing on. Don't worry if you don't understand this straight away, as you start to use NetLogo in earnest you will see how useful this is.
askAlthough changing contexts using the command centre is OK, it would be better if there was a
way to send commands to turtles or patches directly, without re-configuring the commands
centre. We can do this using the ask command.
setup in the Command Centre.set pcolor blue Again, you should get an error telling you that the
'observer' context has no variable called pcolor. This is to be expected,
because the command is being sent to the observer, not the patches.ask to send it to the patches, rather
than the observer:
ask patches [ set pcolor blue ]

Did the patches turn blue? There are a few things happening here:
ask command expects two inputs, both on the
right hand side of the command.patches.set pcolor blue tells every patch to set their pcolor
variable to the value blue.
ask turtles [ set color brown ]
What happens?
ask turtles [ set xcor 1 set ycor 5]
Where have all the turtles moved to? Try this as well
ask turtles [ set xcor -10 set ycor -5]
The people will move again. If you're not sure why this is happening, ask someone!
ask and withThe previous examples of ask have been applied to all the turtles
or patches in the model. However, most of the time it is more useful to execute a command
on a smaller group. To do this, we can use the with command.
setup
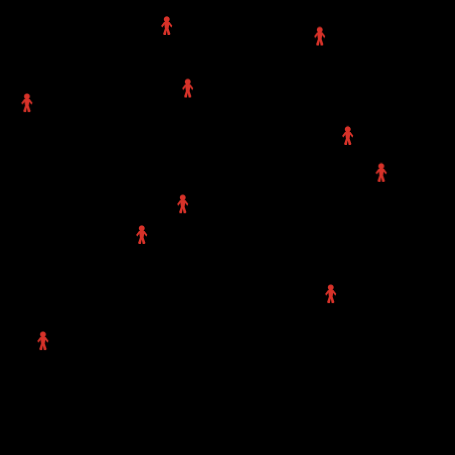
command.ask turtles with [ sick? = true ] [ set color brown ]Here, instead of giving all the turtles to the ask command, we give it
the group of turtles who have a value of true stored in their variable called
sick (this is a special variable created specifically for the 'virus'
model).
Visually, these two commands are constructed like so:
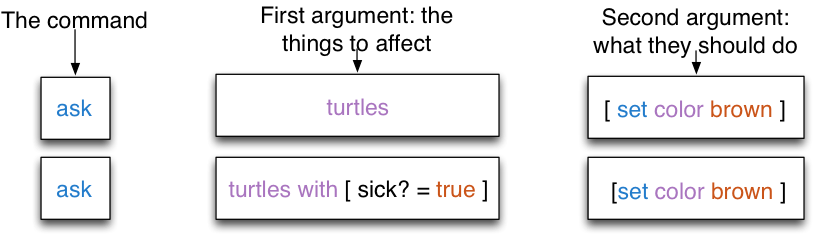
ask turtles with [ sick? = false ] [ set color blue ]ask to run commands on people of different ages:
ask turtles with [ age > 20 ] [ set color yellow ]Finally, we will use a combination of ask and some other commands to
do something more interesting than changing colours.
ask turtles [ forward 1 ]
What is happening? What happens if a negative number is sent to the forward command?
ask turtles [ forward -1 ]ask turtles [ facexy 0 0 ]
ask turtles [ forward 1 ]
ask turtles [ forward 1 ]
ask turtles [ forward 1 ]
You can probably see that the first command (ask turtles [ facexy 0 0 ])
tells each turtle to spin round and face the coordinate (0,0) (which happens to be in the
middle of the world in this model). The commands that follow (ask turtles [ forward 1 ])
tell the agents to move forward one step in the direction that they are facing. This might seem trivial,
but you now have covered the main commands that you need to create an agent-based model!
Remember, information about all the different commands that are available can be found in the NetLogo documentation. In particular, the NetLogo Dictionary lists every command that is available.
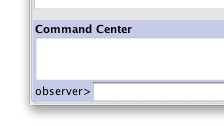
For this activity, continue to use the 'Virus' model. Make sure that the Command
Centre is going to send commands to the observer context (you should see 'observer'
just next to the commands box, as in the right image). Also, press 'setup' to initialise
the model.
ask and
with).
Command:
color and patch
colour is stored in a variable called pcolor.
Command:
That is quite a lot to take in, so don't worry if it seems a bit overwhelming. As with anything new, as you practice it will become familiar. That's all for this practical, if you're really keen you can move straight on to Practical 2, or go and have a well deserved cup of tea.